Compiling from Source
GREAT BIG NEWS
KoLmafia has migrated to the GitHub repository and we are retooling for GIT and gradle builds.
The Windows section of this page is currently out of date. The Linux and macOS ones have been updated.
The good news is that the IDE setup is a lot easier. The bad news is you'll need to take some steps to build anything. In addition, we are discussing changing to a newer required JDK, so even these instructions will not be permanent.
To contribute to the Mafia project, you'll need to be able to install the Java Development Kit, connect to the SVN and be comfortable writing Java Code. Instructions for the first two are included below:
Windows
- Download Tools
- Download and install Java Development Kit 11 or newer, available from Adoption. The current recommended version is Java 17.
- Download and install GIT following the instructions from Atlassian's GIT install page.
- Download and install Tortoise GIT (if needed) from https://tortoisegit.org
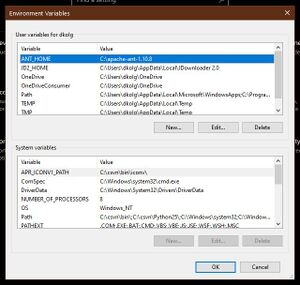
- Configure Windows Environment Variables

Win 10 Environment Variable Editor - Windows 10
- Go to settings
- type 'enviro' in the search
- click on the 'edit environment variables' suggestion
- add or edit JAVA_HOME, and PATH variables
PATH should include JAVA_HOME
If the JAVA installer has already set these variables, they can be updated or left alone.
- Windows 10
- Get Source and Build
- Connect to the Gi server and download the source code for the Mafia Project. Using Tortoise SVN, you have to right-click on your desktop, select "SVN Checkout", and put the URL of the repository as "svn://svn.code.sf.net/p/kolmafia/code/". Leave all other settings as they are, and click OK.
- Copy %ANT_HOME%/bin/ant.bat to your Desktop/kolmafia/ folder. If you have set up ANT correctly (and it's hard not to - there aren't many options) then double clicking on this file should compile the program.
- Compiling creates a "build" and "dist" folder. The end program is in dist/Kolmafia.jar.
Linux
Do once:
- Install git - you probably already have this. If not, follow this guide.
- Get an appropriate JDK. The safest and easiest way to do this is with Adoptium.
- Clone the repo:
- If you have a github account:If not:
git clone git@github.com:kolmafia/kolmafia.git
git clone https://github.com/kolmafia/kolmafia.git
- If you have a github account:
Do every session:
Set up your environment to use that JDK you just downloaded
export PATH="/where/you/put/that/jdk/bin:${PATH}"Actually compile:
cd /where/you/cloned/kolmafia
./gradlew clean shadowJar
Get new updates with
git pull
You have a KoLmafia jar file that can be invoked with
java -jar dist/KoLmafia-*.jar
Do other installation steps as you wish.
MacOSX (updated for Git/Gradle)
- Verify required packages
java --version- if not found or less than Java 11... Install Java Development Kit version 17 from Adoptium Temurin
git --version- If not found ... Install git: Atlassian has a great document on the various ways to install Git
- Configure development environment
Most of these steps can be included in.profileor the equivalent for your terminal of choice.- In the terminal set JAVA_HOME to the java home directory.
/usr/libexec/java_home -Vwill list all known values for java_home.
If you have multiple copies of java, choose the version you want to use.export JAVA_HOME=`/usr/libexec/java_home -v17
- In the terminal set JAVA_HOME to the java home directory.
- Open a new terminal window and navigate to the directory to which you wish to create kolmafia (e.g.
cd ~/projects, or some similar directory) - Clone the source code for the KoLmafia Project.
- If you have a github account:
git clone git@github.com:kolmafia/kolmafia.git
- If not:
git clone https://github.com/kolmafia/kolmafia.git
- If you have a github account:
- Compile KoLmafia with the Gradle wrapper
cd kolmafia && ./gradlew runShadow
Optional
If you intend to commit code to GitHub, you will need to follow GitHub's instructions for adding a Personal Access Token (PAT) '