Difference between revisions of "IntelliJ Setup"
Jump to navigation
Jump to search
imported>Mcroft |
m (→KoLmafia has migrated to the GitHub repository and we are retooling for GIT and gradle builds.) |
||
| (13 intermediate revisions by 4 users not shown) | |||
| Line 1: | Line 1: | ||
| − | |||
| − | + | ==== KoLmafia has migrated to the GitHub with gradle builds. ==== | |
| − | |||
| − | |||
| − | |||
| − | |||
| − | |||
| − | |||
| − | |||
| − | |||
| − | |||
| − | |||
| − | |||
| − | |||
| − | |||
| − | |||
| − | |||
| − | |||
| − | |||
| − | |||
| − | |||
| − | |||
| − | |||
| − | |||
| − | |||
| − | |||
| − | |||
| − | |||
| − | |||
| − | |||
| − | |||
| − | |||
| − | |||
| − | |||
| − | |||
| − | |||
| − | |||
| − | |||
| − | |||
| − | |||
| − | |||
| − | |||
| − | + | ||
| + | [https://www.jetbrains.com/idea/ IntelliJ IDEA] is an IDE for developing Java applications. This guide assumes that you have a recent enough version of Java JDK, Ant, and IntelliJ IDEA. Completing [[Compiling from Source]] is a requirement for this guide, although experienced developers can skip to whatever step is appropriate. | ||
| + | |||
| + | The following instructions are based on IntelliJ IDEA 2021.2 Community Edition. Instructions for other versions/editions of IntelliJ may be slightly different. The latest version is recommended. | ||
| + | |||
| + | == Create a Project == | ||
| + | === Create a new project === | ||
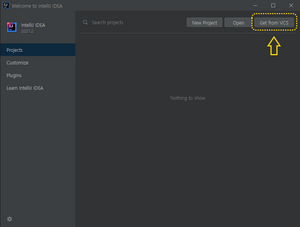
| + | # Start IntelliJ IDEA. In the ''Welcome to IntelliJ IDEA'' dialog, click '''Get from VCS'''.<br>[[File:Intellij-setup-c2021.2-welcome.png|300px]] | ||
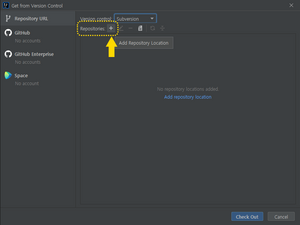
| + | # In the ''Get from Version Control'' dialog, select the '''Repository URL''' tab. | ||
| + | ## In ''Version control'', select '''GitHub'''.<br>[[File:Intellij-setup-c2021.2-get-from-vcs.png|300px]] | ||
| + | ## Add a new repository location. To do so, click the '''+''' button next to ''Repositories''.<br>[[File:Intellij-setup-c2021.2-get-from-vcs-subversion.png|300px]] | ||
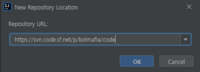
| + | ## In the ''New Repository Location'' popup, enter the URL to KoLmafia's GitHub repository. If you have a GitHub account and a Personal Access Token, use git@github.com:kolmafia/kolmafia.git If you do not have a GitHub account, use https://github.com/kolmafia/kolmafia.git<br>[[File:Intellij-setup-c2021.2-new-repository-location.png|200px]] | ||
| + | ## Click '''OK''' to close the popup. | ||
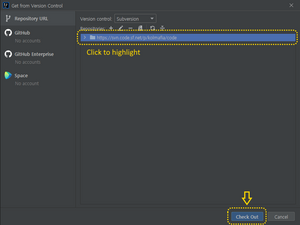
| + | ## Once the repository has been added, '''click the repository URL to highlight it''', then click '''Check Out'''.<br>[[File:Intellij-setup-c2021.2-get-from-vcs-check-out.png|300px]] | ||
| + | # If the ''Destination Directory'' popup appears, choose a directory to check out the working copy.<br>''Caution'': Don't choose a common directory like <samp>C:\Users\<username>\Documents</samp>. Instead, create a new directory under it (by clicking the folder icon) and give it an appropriate name (e.g. <samp>kolmafia</samp>).<br>[[File:Intellij-setup-c2021.2-choose-working-copy-dir.png|200px]]<br>Click '''OK''' to continue. | ||
| + | # IntelliJ will generate a new project. If it asks you whether to add <code>kolmafia.iml</code> to Subversion, you may click '''Cancel''' to skip it | ||
| + | |||
| + | === Add the Gradle Build File === | ||
| + | # Open the Gradle Toolbar Item (typically on the right side, and not very large) | ||
| + | # Click the '''+''' button to add a build file | ||
| + | # Choose build.gradle from the file selector and press Open | ||
| + | #Run Configurations should contain <code>kolmafia [runShadow]</code>. If it does not, continue to the next steps. | ||
| + | #In the Gradle Toolbar click on the elephant to Execute Gradle Task | ||
| + | #A window titled ''Run Anything'' will popup. Search for <code>runShadow</code> and select it | ||
| + | |||
| + | ===How to build and run/debug=== | ||
| + | #Click the drop down in the top right and select the desired option | ||
| + | ##<code>kolmafia [runShadow]</code> is the application itself | ||
| + | ##<code>Tests in 'KoLMafia'</code> are the unit tests | ||
| + | #Click the play button to build and run | ||
| + | #Or click the bug button to build and debug | ||
Latest revision as of 01:09, 5 December 2023
KoLmafia has migrated to the GitHub with gradle builds.
IntelliJ IDEA is an IDE for developing Java applications. This guide assumes that you have a recent enough version of Java JDK, Ant, and IntelliJ IDEA. Completing Compiling from Source is a requirement for this guide, although experienced developers can skip to whatever step is appropriate.
The following instructions are based on IntelliJ IDEA 2021.2 Community Edition. Instructions for other versions/editions of IntelliJ may be slightly different. The latest version is recommended.
Create a Project
Create a new project
- Start IntelliJ IDEA. In the Welcome to IntelliJ IDEA dialog, click Get from VCS.
- In the Get from Version Control dialog, select the Repository URL tab.
- In Version control, select GitHub.

- Add a new repository location. To do so, click the + button next to Repositories.
- In the New Repository Location popup, enter the URL to KoLmafia's GitHub repository. If you have a GitHub account and a Personal Access Token, use git@github.com:kolmafia/kolmafia.git If you do not have a GitHub account, use https://github.com/kolmafia/kolmafia.git
- Click OK to close the popup.
- Once the repository has been added, click the repository URL to highlight it, then click Check Out.
- In Version control, select GitHub.
- If the Destination Directory popup appears, choose a directory to check out the working copy.
Caution: Don't choose a common directory like C:\Users\<username>\Documents. Instead, create a new directory under it (by clicking the folder icon) and give it an appropriate name (e.g. kolmafia).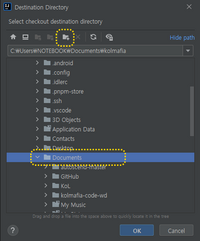
Click OK to continue. - IntelliJ will generate a new project. If it asks you whether to add
kolmafia.imlto Subversion, you may click Cancel to skip it


Add the Gradle Build File
- Open the Gradle Toolbar Item (typically on the right side, and not very large)
- Click the + button to add a build file
- Choose build.gradle from the file selector and press Open
- Run Configurations should contain
kolmafia [runShadow]. If it does not, continue to the next steps. - In the Gradle Toolbar click on the elephant to Execute Gradle Task
- A window titled Run Anything will popup. Search for
runShadowand select it
How to build and run/debug
- Click the drop down in the top right and select the desired option
kolmafia [runShadow]is the application itselfTests in 'KoLMafia'are the unit tests
- Click the play button to build and run
- Or click the bug button to build and debug