Difference between revisions of "IntelliJ Setup"
Jump to navigation
Jump to search
(Added Test Folder designation, because IJ doesn't always automatically detect it (thanks, PhilMasterPlus)) |
(Update guide, adding screenshots from IntelliJ IDEA 2021.2 Community edition) |
||
| Line 1: | Line 1: | ||
| − | This guide assumes that you have a recent enough version of | + | [https://www.jetbrains.com/idea/ IntelliJ IDEA] is an IDE for developing Java applications. This guide assumes that you have a recent enough version of Java JDK, Ant, and IntelliJ IDEA. Completing [[Compiling from Source]] is a requirement for this guide, although experienced developers can skip to whatever step is appropriate. |
| − | == | + | The following instructions are based on IntelliJ IDEA 2021.2 Community Edition. Instructions for other versions/editions of IntelliJ may be slightly different. |
| − | === | + | |
| + | == Create a Project == | ||
| + | === Choice 1: Create a new project === | ||
| + | ''If you already have a working copy of KoLmafia's source code, you can go to choice 2 instead.'' | ||
| + | |||
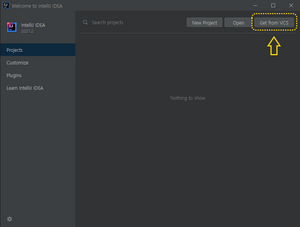
| + | # Start IntelliJ IDEA. In the ''Welcome to IntelliJ IDEA'' dialog, click '''Get from VCS'''.<br>[[File:Intellij-setup-c2021.2-welcome.png|300px]] | ||
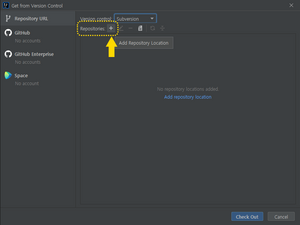
| + | # In the ''Get from Version Control'' dialog, select the '''Repository URL''' tab. | ||
| + | ## In ''Version control'', select '''Subversion'''.<br>[[File:Intellij-setup-c2021.2-get-from-vcs.png|300px]] | ||
| + | ## Add a new repository location. To do so, click the '''+''' button next to ''Repositories''.<br>[[File:Intellij-setup-c2021.2-get-from-vcs-subversion.png|300px]] | ||
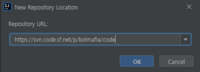
| + | ### In the ''New Repository Location'' popup, enter the URL to KoLmafia's Subversion repository. Currently, this is https://svn.code.sf.net/p/kolmafia/code.<br>[[File:Intellij-setup-c2021.2-new-repository-location.png|200px]] | ||
| + | ### Click '''OK''' to close the popup. | ||
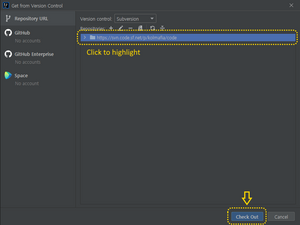
| + | ## Once the repository has been added, '''click the repository URL to highlight it''', then click '''Check Out'''.<br>[[File:Intellij-setup-c2021.2-get-from-vcs-check-out.png|300px]] | ||
| + | # If the ''Destination Directory'' popup appears, choose a directory to check out the working copy.<br>''Caution'': Don't choose a common directory like <samp>C:\Users\<username>\Documents</samp>. Instead, create a new directory under it (by clicking the folder icon) and give it an appropriate name (e.g. <samp>kolmafia</samp>).<br>[[File:Intellij-setup-c2021.2-choose-working-copy-dir.png|200px]]<br>Click '''OK''' to continue. | ||
| + | # If the ''SVN Checkout Options'' popup appears, leave everything as-is and click '''OK'''. | ||
| + | # If the ''Subversion Working Copy Format'' popup appears, choose the latest version (which is <samp>1.8 format</samp> as of writing) and click '''OK'''. | ||
| + | # IntelliJ will generate a new project. If it asks you whether to add <code>kolmafia.iml</code> to Subversion, you may click '''Cancel''' to skip it. | ||
| + | |||
| + | === Choice 2: Load an existing working copy into IntelliJ === | ||
# From the IntelliJ IDEA '''File''' Menu, choose '''New'''>'''New Project from Existing Sources...''' | # From the IntelliJ IDEA '''File''' Menu, choose '''New'''>'''New Project from Existing Sources...''' | ||
#Choose the directory with the kolmafia build.xml file and press '''Open''' | #Choose the directory with the kolmafia build.xml file and press '''Open''' | ||
| Line 11: | Line 28: | ||
=== Add the Ant Build File === | === Add the Ant Build File === | ||
# Open the Ant Toolbar Item (typically on the right side, and not very large) | # Open the Ant Toolbar Item (typically on the right side, and not very large) | ||
| − | # | + | # Click the '''+''' button to add a build file |
# Choose build.xml from the file selector and press Open | # Choose build.xml from the file selector and press Open | ||
# Verify that a list of ANT targets appears in the Ant Toolbar | # Verify that a list of ANT targets appears in the Ant Toolbar | ||
| + | == Configure Project == | ||
=== Check Project Settings === | === Check Project Settings === | ||
| − | # | + | # In the top menu, select '''File''' > '''Project Structure...''' to launch the ''Project Structure'' dialog. |
| − | # | + | # In the left menu, select '''Project Settings''' > '''Project''' |
| − | ## set the '''Name''' to kolmafia | + | ## set the '''Name''' to <kbd>kolmafia</kbd> |
| − | ## set the '''Project SDK''' to | + | ## set the '''Project SDK''' to a version installed on your system. '''This must be at least 1.8'''. |
| − | ## set the project language level to 8 | + | ## set the project language level to '''8''' |
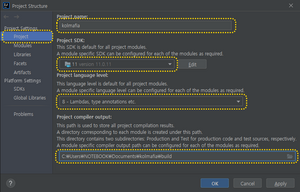
| − | ## set the project compiler output to the build subdirectory | + | ## set the project compiler output path to the <kbd><project dir>\build</kbd> subdirectory<br>[[File:Intellij-setup-c2021.2-project-structure-project.png|300px]] |
| − | # | + | # In the left menu, select '''Project Settings''' > '''Libraries''' |
| − | ## | + | ## Add a project library with the name <kbd>kol-library-jars</kbd>: |
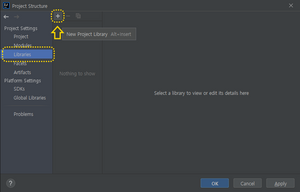
| − | ## | + | ### Click the '''+''' button (''New Project Library''), then select '''Java''' to add a new project library<br>[[File:Intellij-setup-c2021.2-project-structure-libraries-new.png|300px]] |
| − | # | + | ### If the ''Select Library Files'' popup appears, navigate to <code><project dir>\lib\jar</code> directory and select ''all'' JAR files. You can <kbd>shift</kbd>+click the first and last JAR files to select multiple files at once.<br>[[File:Intellij-setup-c2021.2-project-structure-libraries-select-jars.png|300px]]<br>Click '''OK''' to close the popup. |
| − | ## | + | ### If the ''Choose Modules'' popup appears, ensure that <samp>kolmafia</samp> is highlighted, then click '''OK'''.<br>[[File:Intellij-setup-c2021.2-project-structure-libraries-choose-modules.png|300px]] |
| − | + | ### If you followed the steps above, IntelliJ will create a project library using the name of the first JAR file.<br>To rename it, select the library, then select the '''Name''' field and enter <kbd>kol-library-jars</kbd>.<div><ul><li style="display: inline-block;"> [[File:Intellij-setup-c2021.2-project-structure-libraries-rename-library.png|thumb|none|300px|Before renaming]]</li><li style="display: inline-block;"> [[File:Intellij-setup-c2021.2-project-structure-libraries-renamed.png|thumb|none|300px|After renaming]]</li></ul></div> | |
| − | ## | + | ## Repeat the steps above to add a project library with the name <kbd>kol-source-jars</kbd>, selecting all JAR files under <code><project dir>\src\jar\</code>. |
| − | ## | + | ## Repeat the steps above to add a project library with the name <kbd>kol-test-jars</kbd>, selecting all JAR files under <code><project dir>\lib\testjar\</code>. |
| − | ## Select | + | ## Click '''Apply'''. |
| − | ## | + | # In the left menu, select '''Project Settings''' > '''Modules''' |
| − | # | + | ## Select the '''Dependencies''' tab |
| − | ## | + | ### If you followed the instructions so far, this section will have libraries with incorrect names (i.e. using the names of the first JAR file in each library). Select them all and click '''-''' to remove them.<br>[[File:Intellij-setup-c2021.2-project-structure-modules-remove-bad-libraries.png|300px]] |
| − | ### Right-click the '''lib''' and '''src''' folders and verify that each is marked as ''Sources'' | + | ### Add the correct project libraries by clicking '''+''', then '''Library'''.<br>[[File:Intellij-setup-c2021.2-project-structure-modules-add-library.png|300px]] |
| − | ### Right-click the '''test''' folder | + | #### In the ''Choose Libraries'' dialog, select all project libraries we added so far, then click '''Add Selected'''.<br>[[File:Intellij-setup-c2021.2-project-structure-modules-choose-libraries.png|300px]] |
| − | ## | + | ## Select the '''Sources''' tab |
| − | # | + | ### Right-click the '''lib''' and '''src''' folders. If the and verify that each is marked as ''Sources'' |
| + | ### Right-click the '''test''' folder. If the folder is not marked as '''Tests''', click the menu item to check it.<br>[[File:Intellij-setup-c2021.2-project-structure-modules-sources.png|300px]] | ||
| + | ## Select the '''Paths''' tab | ||
| + | ### Select '''Inherit project compile output path'''<br>[[File:Intellij-setup-c2021.2-project-structure-modules-paths.png|300px]] | ||
| + | # Click '''OK''' to close the ''Project Structure'' dialog | ||
=== Add Run/Debug Configuration === | === Add Run/Debug Configuration === | ||
| − | # | + | # In the top menu, select '''Run''' > '''Edit Configurations...''' to launch the ''Run/Debug Configurations'' dialog. |
| − | # | + | # Click the '''+''' button, then choose '''Application''' to add a new configuration |
| − | |||
# In the '''Name''' Field, enter "KoLmafia" | # In the '''Name''' Field, enter "KoLmafia" | ||
| − | # | + | # Click the icon that looks like a document ("Browse...") to the right of the '''Main Class''' field. |
| + | ## If the ''Choose Main Class'' popup appears, wait until IntelliJ populates the list of possible main classes, then choose '''<samp>KoLmafia</samp>''' and click '''OK''' | ||
# Add any VM or program arguments needed (typically none) | # Add any VM or program arguments needed (typically none) | ||
| − | # | + | # Enter the working directory. This is where KoLmafia will store your user data when launched from inside IntelliJ (e.g. <samp>C:\Users\<user>\Documents\kolmafia-workdir</samp>).<br>''Caution'': This should be different from the project directory! |
| − | # Add the | + | # Add the "before launch" tasks: |
| − | ## | + | ## Click '''Modify options''' at the top right and select '''Add before launch task''' |
| − | ## | + | ## Add the '''set.released.false''' Ant task: |
| − | ## | + | ### Click the '''+''' button to the right of ''Before launch'', then '''Run Ant target'''. |
| − | ## | + | ### If the ''Choose Ant Target to Execute'' popup appears, select '''set.released.false''' and click '''OK'''. |
| − | # | + | ## Repeat the steps above to add the '''set.version''' Ant task |
| − | # | + | ## Repeat the steps above to add the '''unset.properties''' Ant task |
| + | ## Drag-and-drop the tasks to ensure that each task is executed in the following order: | ||
| + | ### Run Ant target 'set.released.false' | ||
| + | ### Run Ant target 'set.version' | ||
| + | ### Build | ||
| + | ### Run Ant target 'unset.properties' | ||
| + | # Click '''OK''' to close the ''Run/Debug Configurations'' dialog. | ||
Test by pressing the Run arrow next to your config name in the toolbar at the top of the window. | Test by pressing the Run arrow next to your config name in the toolbar at the top of the window. | ||
Revision as of 09:43, 2 August 2021
IntelliJ IDEA is an IDE for developing Java applications. This guide assumes that you have a recent enough version of Java JDK, Ant, and IntelliJ IDEA. Completing Compiling from Source is a requirement for this guide, although experienced developers can skip to whatever step is appropriate.
The following instructions are based on IntelliJ IDEA 2021.2 Community Edition. Instructions for other versions/editions of IntelliJ may be slightly different.
Create a Project
Choice 1: Create a new project
If you already have a working copy of KoLmafia's source code, you can go to choice 2 instead.
- Start IntelliJ IDEA. In the Welcome to IntelliJ IDEA dialog, click Get from VCS.
- In the Get from Version Control dialog, select the Repository URL tab.
- In Version control, select Subversion.

- Add a new repository location. To do so, click the + button next to Repositories.
- In the New Repository Location popup, enter the URL to KoLmafia's Subversion repository. Currently, this is https://svn.code.sf.net/p/kolmafia/code.
- Click OK to close the popup.
- In the New Repository Location popup, enter the URL to KoLmafia's Subversion repository. Currently, this is https://svn.code.sf.net/p/kolmafia/code.
- Once the repository has been added, click the repository URL to highlight it, then click Check Out.
- In Version control, select Subversion.
- If the Destination Directory popup appears, choose a directory to check out the working copy.
Caution: Don't choose a common directory like C:\Users\<username>\Documents. Instead, create a new directory under it (by clicking the folder icon) and give it an appropriate name (e.g. kolmafia).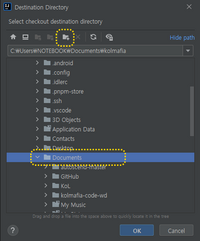
Click OK to continue. - If the SVN Checkout Options popup appears, leave everything as-is and click OK.
- If the Subversion Working Copy Format popup appears, choose the latest version (which is 1.8 format as of writing) and click OK.
- IntelliJ will generate a new project. If it asks you whether to add
kolmafia.imlto Subversion, you may click Cancel to skip it.


Choice 2: Load an existing working copy into IntelliJ
- From the IntelliJ IDEA File Menu, choose New>New Project from Existing Sources...
- Choose the directory with the kolmafia build.xml file and press Open
- Choose Create Project from Existing Sources and press Next
- Enter the name KoLmafia and press Next
- Verify that the project is visible to IDEA and press Finish
Add the Ant Build File
- Open the Ant Toolbar Item (typically on the right side, and not very large)
- Click the + button to add a build file
- Choose build.xml from the file selector and press Open
- Verify that a list of ANT targets appears in the Ant Toolbar
Configure Project
Check Project Settings
- In the top menu, select File > Project Structure... to launch the Project Structure dialog.
- In the left menu, select Project Settings > Project
- set the Name to kolmafia
- set the Project SDK to a version installed on your system. This must be at least 1.8.
- set the project language level to 8
- set the project compiler output path to the <project dir>\build subdirectory
- In the left menu, select Project Settings > Libraries
- Add a project library with the name kol-library-jars:
- Click the + button (New Project Library), then select Java to add a new project library
- If the Select Library Files popup appears, navigate to
<project dir>\lib\jardirectory and select all JAR files. You can shift+click the first and last JAR files to select multiple files at once.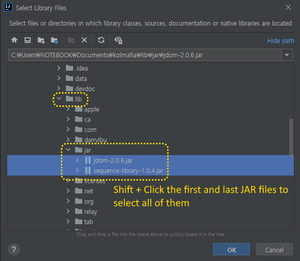
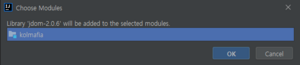
Click OK to close the popup. - If the Choose Modules popup appears, ensure that kolmafia is highlighted, then click OK.
- If you followed the steps above, IntelliJ will create a project library using the name of the first JAR file.
To rename it, select the library, then select the Name field and enter kol-library-jars.
- Click the + button (New Project Library), then select Java to add a new project library
- Repeat the steps above to add a project library with the name kol-source-jars, selecting all JAR files under
<project dir>\src\jar\. - Repeat the steps above to add a project library with the name kol-test-jars, selecting all JAR files under
<project dir>\lib\testjar\. - Click Apply.
- Add a project library with the name kol-library-jars:
- In the left menu, select Project Settings > Modules
- Select the Dependencies tab
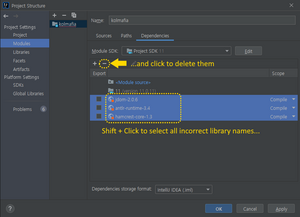
- If you followed the instructions so far, this section will have libraries with incorrect names (i.e. using the names of the first JAR file in each library). Select them all and click - to remove them.
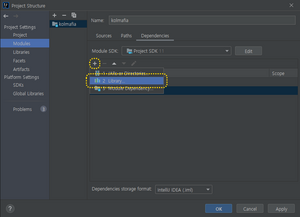
- Add the correct project libraries by clicking +, then Library.
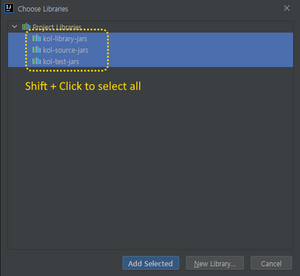
- In the Choose Libraries dialog, select all project libraries we added so far, then click Add Selected.
- In the Choose Libraries dialog, select all project libraries we added so far, then click Add Selected.
- If you followed the instructions so far, this section will have libraries with incorrect names (i.e. using the names of the first JAR file in each library). Select them all and click - to remove them.
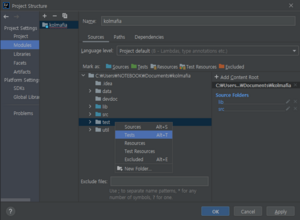
- Select the Sources tab
- Right-click the lib and src folders. If the and verify that each is marked as Sources
- Right-click the test folder. If the folder is not marked as Tests, click the menu item to check it.
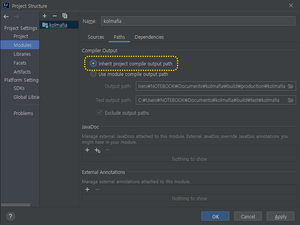
- Select the Paths tab
- Select Inherit project compile output path
- Select Inherit project compile output path
- Select the Dependencies tab
- Click OK to close the Project Structure dialog


Add Run/Debug Configuration
- In the top menu, select Run > Edit Configurations... to launch the Run/Debug Configurations dialog.
- Click the + button, then choose Application to add a new configuration
- In the Name Field, enter "KoLmafia"
- Click the icon that looks like a document ("Browse...") to the right of the Main Class field.
- If the Choose Main Class popup appears, wait until IntelliJ populates the list of possible main classes, then choose KoLmafia and click OK
- Add any VM or program arguments needed (typically none)
- Enter the working directory. This is where KoLmafia will store your user data when launched from inside IntelliJ (e.g. C:\Users\<user>\Documents\kolmafia-workdir).
Caution: This should be different from the project directory! - Add the "before launch" tasks:
- Click Modify options at the top right and select Add before launch task
- Add the set.released.false Ant task:
- Click the + button to the right of Before launch, then Run Ant target.
- If the Choose Ant Target to Execute popup appears, select set.released.false and click OK.
- Repeat the steps above to add the set.version Ant task
- Repeat the steps above to add the unset.properties Ant task
- Drag-and-drop the tasks to ensure that each task is executed in the following order:
- Run Ant target 'set.released.false'
- Run Ant target 'set.version'
- Build
- Run Ant target 'unset.properties'
- Click OK to close the Run/Debug Configurations dialog.
Test by pressing the Run arrow next to your config name in the toolbar at the top of the window.
Optional Steps
- Setup SVN to update from IntelliJ (can still be done from the command line or a tool)
- TODO: FIXME...
- To use the Reformat Code feature, download the KoLMafia Style Definitions and import them in the IntelliJ Code Style Preferences.