IntelliJ Setup
Revision as of 01:09, 5 December 2023 by Mcroft (talk | contribs) (→KoLmafia has migrated to the GitHub repository and we are retooling for GIT and gradle builds.)
KoLmafia has migrated to the GitHub with gradle builds.
IntelliJ IDEA is an IDE for developing Java applications. This guide assumes that you have a recent enough version of Java JDK, Ant, and IntelliJ IDEA. Completing Compiling from Source is a requirement for this guide, although experienced developers can skip to whatever step is appropriate.
The following instructions are based on IntelliJ IDEA 2021.2 Community Edition. Instructions for other versions/editions of IntelliJ may be slightly different. The latest version is recommended.
Create a Project
Create a new project
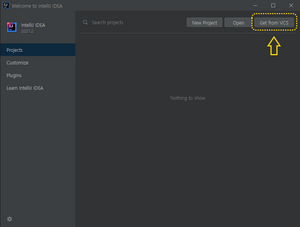
- Start IntelliJ IDEA. In the Welcome to IntelliJ IDEA dialog, click Get from VCS.
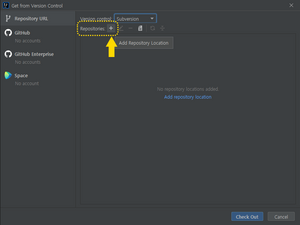
- In the Get from Version Control dialog, select the Repository URL tab.
- In Version control, select GitHub.

- Add a new repository location. To do so, click the + button next to Repositories.
- In the New Repository Location popup, enter the URL to KoLmafia's GitHub repository. If you have a GitHub account and a Personal Access Token, use git@github.com:kolmafia/kolmafia.git If you do not have a GitHub account, use https://github.com/kolmafia/kolmafia.git
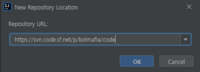
- Click OK to close the popup.
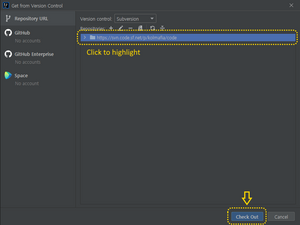
- Once the repository has been added, click the repository URL to highlight it, then click Check Out.
- In Version control, select GitHub.
- If the Destination Directory popup appears, choose a directory to check out the working copy.
Caution: Don't choose a common directory like C:\Users\<username>\Documents. Instead, create a new directory under it (by clicking the folder icon) and give it an appropriate name (e.g. kolmafia).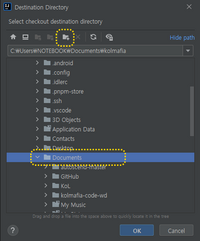
Click OK to continue. - IntelliJ will generate a new project. If it asks you whether to add
kolmafia.imlto Subversion, you may click Cancel to skip it


Add the Gradle Build File
- Open the Gradle Toolbar Item (typically on the right side, and not very large)
- Click the + button to add a build file
- Choose build.gradle from the file selector and press Open
- Run Configurations should contain
kolmafia [runShadow]. If it does not, continue to the next steps. - In the Gradle Toolbar click on the elephant to Execute Gradle Task
- A window titled Run Anything will popup. Search for
runShadowand select it
How to build and run/debug
- Click the drop down in the top right and select the desired option
kolmafia [runShadow]is the application itselfTests in 'KoLMafia'are the unit tests
- Click the play button to build and run
- Or click the bug button to build and debug